Wednesday, September 17, 2014

Halloween Flea Market Decor 2014

If you know me, I'm all about saving money. However, I do love to decorate. I'm going to show you that you can decorate nicely for Halloween with secondhand items. 


98% of the decor in our home was purchased at Flea Markets, Garage Sales and Craigslist. And our Halloween Decor is no different. A majority of it was purchased at Flea Markets and almost every single item was less than one dollar! Yep, you read right. Because one dollar make me hollar! ;0)


The only thing about buying secondhand, is you are going to be buying items throughout the year. So, you will need to be able to store the items. 


The above two totes had tons in them. I honestly couldn't remember all the things I had to use. 


Geez! And to think I didn't believe I had much to decorate with. 


Hey, it's going to get worse before it gets better. 


I think the Fireplace Mantel turned out spookified.  I do have a string of pumpkin lights that I might still hang along the mantel. And I might embellish the mirror with webbing. 


Trick or Treat spelled with Scrabble Tiles. Gotta use what you got. 


The Spiders on the Candles look Creepy. 


I'll get you My Pretty! And your Little Cat too! ;0)


Love this Statue. Reminds me of Hubby and I. I can't believe this only cost me $1! 
Love Never Dies! 


Cute Pumpkin. 


It's so spookified! 


Orange Gladiolus Flowers and A Ceramic Pumpkin look very festive. 
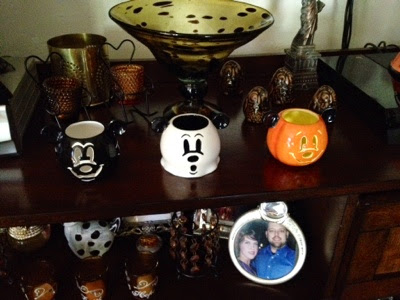
 
Disney Halloween Candle Votives were given to me as a gift. 


Witch from the South and Tinsel Spiders. 


I don't think my Husband is going to appreciate this Scaredy Cat sitting on his play station. It will most likely be moved. 


Gardening Pumpkin. 


Twig Pumpkin. 


Frankenstein. 


Hubby and I on Halloween 2012. Devil and Geisha. 


Three Pumpkin Light. 


Pumpkin with Crazy Eyes. 


Love these two Treat Bags with Dangly Legs. These cost me no more than $1 each. They are of good quality too. 


The Witch is in! 


Halloween Countdown Calendar. 


Candle Votives with Black Cats and Owls. 


I'm going to use the Pumpkins as Serving Platters. 


This Witch Door Knob Hanger reminds me of a former boss of mine. I know, I'm a stinker...

That's going to be it on my Holiday Decor for now. I plan on blogging about my dining table display and possibly our outdoor decor in another post. As well as my costume for this year. 

Don't turn your nose up to secondhand items. It will allow you to decorate nicely on any budget. Till next time Ghouls and Gobblins! 

      

Friday, September 5, 2014

A Sea Shell Cross from The Sea Shore

Step One- Gather Sea Shells. 
Step Two- Let Jesus take the wheel. 

If that doesn't work, here is what you do. 


I thought I would get in one last summery do it yourself project. A Sea Shell Cross with hand collected Sea Shells off the beautiful beaches of San Diego, CA. 


All I used was a gift box, hot glue gun/sticks and the Sea Shells I collected. 


I drew out the cardboard pieces to make the cross and glued them together. I actually made it thicker than this by cutting strips the same size to glue to the back. Due to the weight of the Sea Shells, I would suggest using pieces of wood or twigs. Though, both Crosses made today are hanging up just fine with the cardboard used. 


These are all Sea Shells collected by yours truly. I usually have them in glass jars on my front porch, but I brought these over to a friends house for this DIY project. 


This is the start of my friends Cross. She actually used the best Sea Shell I had for her center. What a gorgeous Sea Shell to be found at the beach. 


Here is how her Cross turned out. I like how she used shells of muscles at the bottom. 


Here is my Cross in process. This is a super easy project. All you do is hot glue the Sea Shells to the cardboard. 


I like that you really can't go wrong and it doesn't have to be perfect. It will all come together in the end. 


Such a lovely DIY project that didn't cost me anything, just the hot glue that was used. A piece of twine or string to hang it will work perfectly. A friend of mine even suggested sprinkling sand over it with modge podge. I like that idea. 


While I was busy collecting Sea Shells this day, my darling Husband was turning the beach into a giant etch-a-sketch. Sam hearts Leslie.  :0)


Back off ladies! This beach bathing beauty is all mine. 


Lots of Love to you and yours from the beautiful beaches of San Diego, CA. Wish you were here! 


Tuesday, August 26, 2014

A Swap Meet Roll Top Desk

It was a successful quick trip to the Swap Meet this weekend. 


Look at this lovely Secretary Roll Top Desk that came home with me for $20. Actually $19.97, since there were 3 pennies in the drawers. 


It cleaned up nicely too. I plan on using it as a vanity for my makeup. All those slots and cubbies will be perfect. And I like that I can pull the top down to hide all from view.  


I just adore the flower carvings on the legs. So sexy! 


Heart Iron Rack cost $2. I plan on using it to display my nail polish. 


Spice Rack cost $1. I also plan on using this to display my nail polish. I'm going to hang it on the wall and paint it. 


Wire Tea Pot cost $1. Too cute to pass up. 


Here it is in all it's glory at the Swap Meet. 


Wood Blinds cost $5. We are finally going to have some privacy in our household.  Rather than being some nosey neighbor's Reality TV every night. This was my best buy of the day! Whoot!


Butterfly Plaque cost $1. I bought this to put near our baby girls ashes. However, I didn't notice until I got home that it says "beings" instead of "begins"! Really? What the hell?!? I still like it though...but I wouldn't of bought it had I noticed. 


Owl earrings cost $1. I'll admit it, I have an Owl Obsession. 


All new jewelry at this stand is always $1. 


Sandals cost $2 each. Cute for the summer. They still had the tags on. 

I also bought Scrubbing Bubbles Cleaner, Soft Scrub Cleaner and Coconut Butter Lotion all in full condition for $1 each.  The Swap Meet is a great place to find brand name products for super cheap. So, don't turn your nose up to it!

Till next time!